
Converting temperature to RGB in Substance Designer.
First of all I want to state that I didn't made the algorithms to convert temperature to RGB. The original formula was made by Tanner Helland. He found data online about some measurements on color temperature. Which he used to make a close approximation formula, for a faster alternative than the ‘standard’ calculation. His formula was changed by Neil B to give a more accurate result especially around 6500 Kelvin.
My part was to simply translate it into a substance for making light sources with accurate light colors. But still give the user enough options to use it however they want.
For you who don't know what color temperature is, here is a brief explanation.
Color temperature is the temperature in Kelvin of a black body (an opaque and non-reflective body) lightsource that radiates light of a color comparable to that of the light source.
This is a very brief summary and if you want to learn more I suggest you go to:
Let’s finally jump into Substance Designer
From the beginning I knew that I was going to need only one node for the calculation, the pixel processor. This node is perfect for these kind of problems. And it turned out that was all I needed in the main graph, except for the uniform color node for the roughness.
The substance has three outputs: basecolor, emissive and roughness. Both the basecolor and roughness are optional, I included them to give the user more control in Substance Painter.
And that’s it for the main graph. Nothing fancy going on in here. So let’s open the first pixel processor, where all the magic is happening.
The pixel processor
Pixel processor node with the Tanner Hellands formula.
The node is separated into four sections, from left to right:
1. List of preset values
2. Main input and a boolean switch
3. The conversion formula
4. Range remap and the alpha channel
The main input at the top of the graph gets a variable called Temperature. This is a float value in a range of 1000-27000 K. The value goes to boolean switch where it can be switched to use a preset value from the list on the left. The input goes to the formula section where the float value is converted from Kelvin to RGB. This is done by the code below.
Tanner Hellands original code:
Set Temperature = Temperature \ 100
Calculate Red:
If Temperature <= 66 Then
Red = 255
Else
Red = Temperature – 60
Red = 329.698727446 * (Red ^ -0.1332047592)
If Red < 0 Then Red = 0
If Red > 255 Then Red = 255
End If
Calculate Green:
If Temperature <= 66 Then
Green = Temperature
Green = 99.4708025861 * Ln(Green) – 161.1195681661
If Green < 0 Then Green = 0
If Green > 255 Then Green = 255
Else
Green = Temperature – 60
Green = 288.1221695283 * (Green ^ -0.0755148492)
If Green < 0 Then Green = 0
If Green > 255 Then Green = 255
End If
Calculate Blue:
If Temperature >= 66 Then
Blue = 255
Else
If Temperature <= 19 Then
Blue = 0
Else
Blue = Temperature – 10
Blue = 138.5177312231 * Ln(Blue) – 305.0447927307
If Blue < 0 Then Blue = 0
If Blue > 255 Then Blue = 255
End If
End If
After the conversion the output is remapped from 0-255 to 0-1 and goes to the output a vector float 4 node, where the alpha channel is added.
That’s it for the pixel processor node.
In the main graph the output from the pixel processor is connected to the output nodes baseColor and emissive.
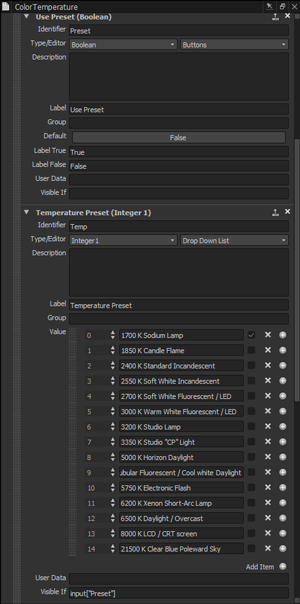
The only thing missing are the input parameters:
- Preset (Boolean): Whether to use the main input or a preset value.
- Temp (Integer 1): ‘Iterator’ for the temperature preset list.
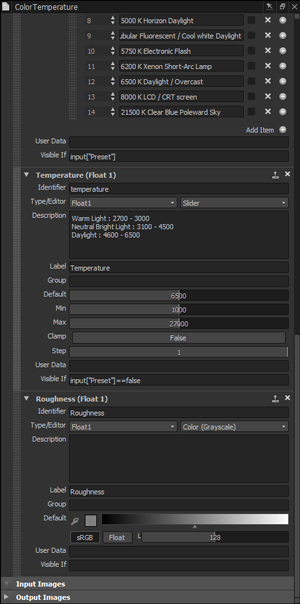
- Temperature (Float 1): Temperature input value.
- Roughness (Float 1): Roughness value.
In the input parameter of Temperature Preset I made the list parameter only visible if the boolean switch (Preset) is set to true. Because it isn’t relative if we want to use a custom temperature input. Sadly this only works in Substance Designer and not in Substance Painter.
I also added some reference temperature colors in description of the Temperature parameter. With the information given the user has a rough idea what to use for light colors.
Input & Preset list
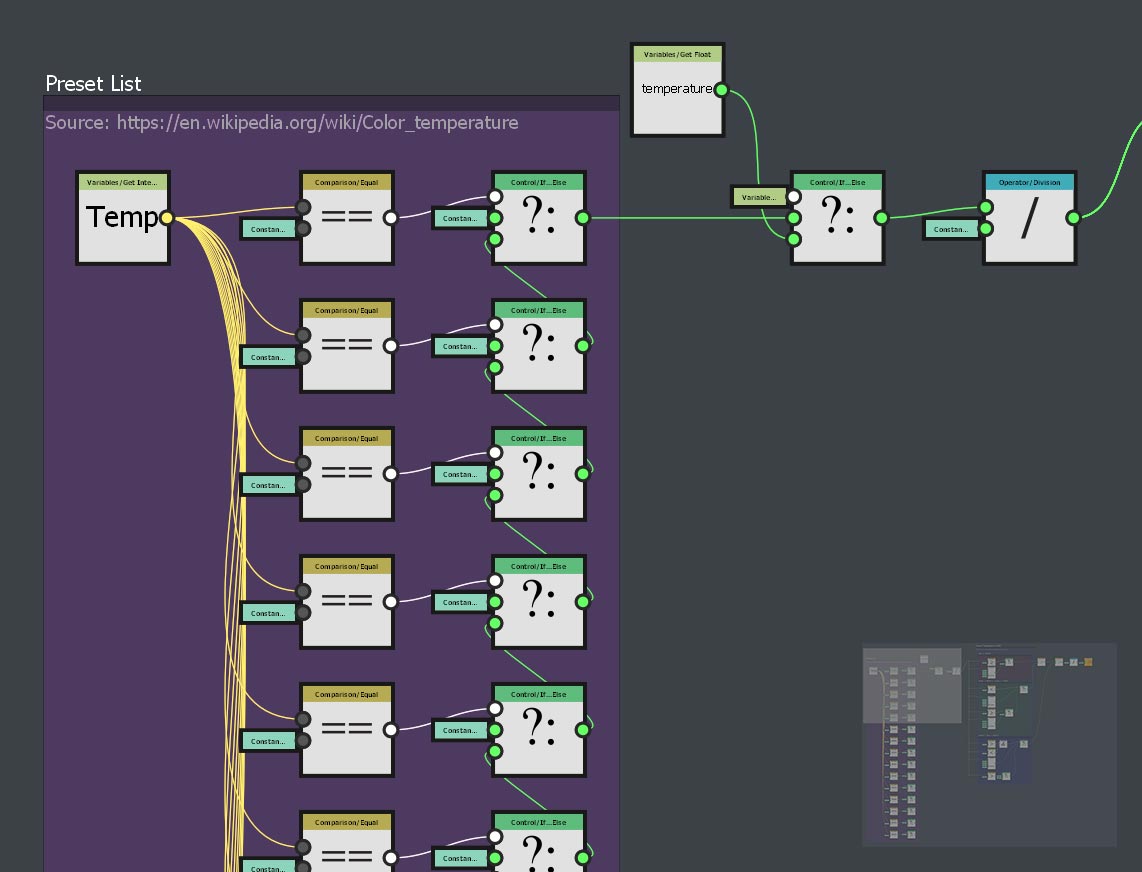
The input of this graph is a float variable or it comes from the preset list, depending on the state of the boolean switch. The original algorithm is well fitted for values (temperatures) between 1000-40000 Kelvin. However this range is far too large for the function(accurate light color for light sources) of this Substance. So I limited the range in the input parameter to 1000-27000 K. Which is still a very large range for lights, however some high values could be useful for some users.
The preset list is constructed in a common way for easy expandability. It ‘iterates' from 0 to 15 int and checks if the value is equal to the set value. Then it sends a temperature value through the if/else chain to the top, towards the boolean switch.
Conversion formula
The conversion formula calculates the RGB value for each of the channels separately.
And it also splits the temperature into two groups, above and below 6600 K. Sadly I couldn’t use reusable function nodes to optimize it, because it uses a couple different methods for the calculation.
Conversion formula separated by temperatures below or above 6600 K.
Although the algorithm is quite accurate overall, it lacks the precision around 6500 K. Which is the ‘turnover point' where the color changes from warm to cold. The next algorithm improved exactly that.
For the new algorithm I only removed the conversion formula everything else stays the same.
Improved accuracy
The new algorithm by Neil B uses a different best fit formula with a more accurate approximation. Because every channel uses the same formula it means the function graph can be compressed with the following recurring function.
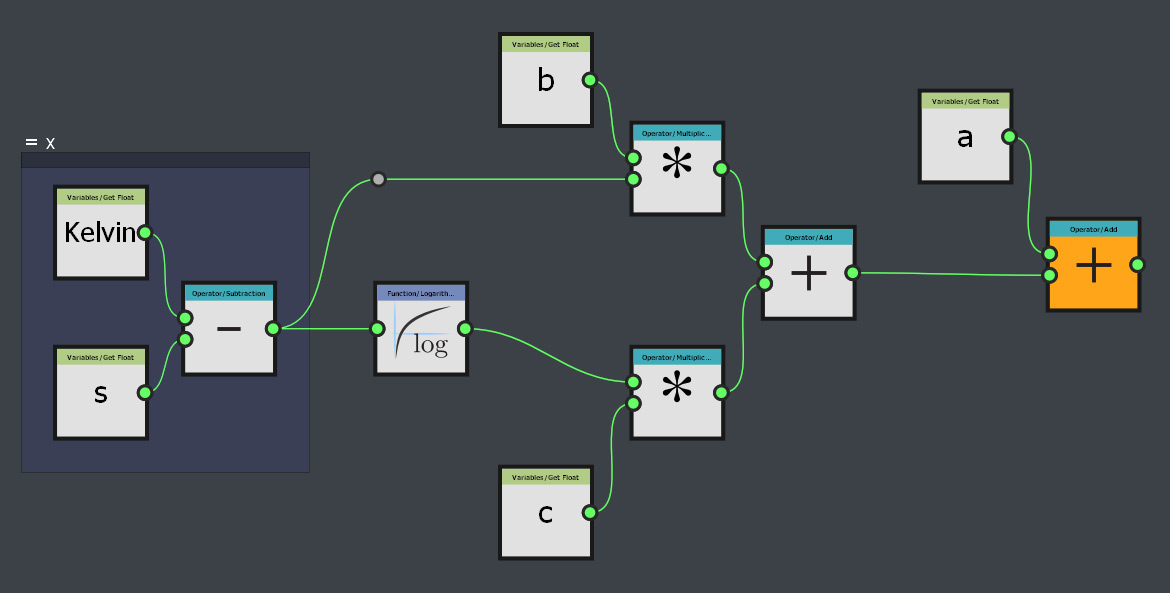
Best fit function. a + b*x + c ln(x)
Each of variables is a input parameter for the function. The float variable ‘Kelvin’ is the temperature input divide by 100.
With the new function finished, I only have to set the right values into the function and everything is working perfectly. Luckily I didn’t have to calculate this, I used the values Neil provided in his blog post.
With the new function all setup, the new pixel processor graph looks like this.
Range remapping
At the end of the graph the output value is converted from 0-255 to 0-1 and combined with a 4th channel, the alpha channel. For now the alpha channel isn’t doing anything, because I wanted the main purpose of this substance to be making accurate light sources. And a premade mask would give the user less control. It could be used
Looking back & forward
The algorithm could also be made with a uniform color node with the formula inside the function graph, this would have produced the same result. The compute time might be slightly different than the pixel processor. However the current compute time on my machine is on average around 0,1 ms. So it wouldn’t make a big difference compute wise.
There are a couple of features I still want to make for greater capabilities and further ease of use. The option to use a texture map as an input, which will output a color corrected texture based on a color temperature. This would function as a white balance color correction operation.
It would be useful if you could switch between the current preset list and a more detailed list of commonly used lights. This would be really useful for making of custom environment maps.
I posted the substance (sbar and the sbs) to Substance Share, where you can download it for free. The images in this blogpost are made with the glare post effects in Substance Painter. Without any post effects the output will be an accurate color
If you have any questions, comments or suggestions, feel free to contact me.
Stay tuned for more.